How To Make A Homemade Cannabis Vaporizer?

Everyone’s talking about vaping.
Tobacco smokers are switching to vapes, those who might once have started smoking cigarettes are starting with vapes instead – and of course, there’s an enormous selection of vaporizers that let you vape cannabis flower, wax, and oil.
And vaping weed is becoming more and more popular. There isn’t much research on the subject, but one study from the late 2010s found that 12% of weed users only vaped, 37% had vaped in the past month, and 61% had tried it. It’s now five years later, and those numbers are unquestionably much higher.
Vaporizers are a lot more expensive than rolling papers or a cheap bowl, though. The highest-priced, full-featured models will set you back hundreds of dollars. And even though you can pick up a simple vape pen for twenty or thirty bucks, it won’t be long before you’ll want to graduate to something more powerful and customizable.
What do you do if you just want to give vaping a try – but don’t want to lay out that kind of money, and don’t have a friend who owns a vaporizer?
You make your own, of course.
Here are two ways to make a homemade weed vaporizer.
Why Vape?
Those who “grew up” smoking weed may not understand why you’d want to complicate things by using a vaporizer. Rolling a joint or packing a bowl is simple and inexpensive (except for the flower, of course), and you don’t have to figure out how to make it work.
The advantages of vaping, however, have convinced many smokers to make the switch.
- Research shows that vaping is better for your health than smoking. Even though cannabis smoke is much less harmful than tobacco smoke, it still contains some hazardous chemicals. Most of those chemicals aren’t in weed vapor, because the flower is only heated, not burned.
- Vaping can provide more enjoyment. Vapor delivers a more potent hit than smoke, delivering a better and faster high. The lower temperature of vapor also allows users to taste more of a strain’s unique flavor.
- Vaping provides the user with more control. Temperature and power adjustments allow users to customize the intensity and effects of the vaping experience.
- Vaping is much more discreet, since the telltale odor that smoking produces isn’t as obvious as the smell of weed smoke.
Ready to give it a try?
Making A Homemade Weed Vaporizer: The Light Bulb Method
If you have trouble cutting a piece of cake without getting crumbs all over the floor, or you can never remember which way to turn a screwdriver, you might want to skip to our second method. Using a “light bulb vaporizer,” though, will provide a more satisfying experience – and it’s really not difficult to make one. The most important thing you’ll need will be patience.
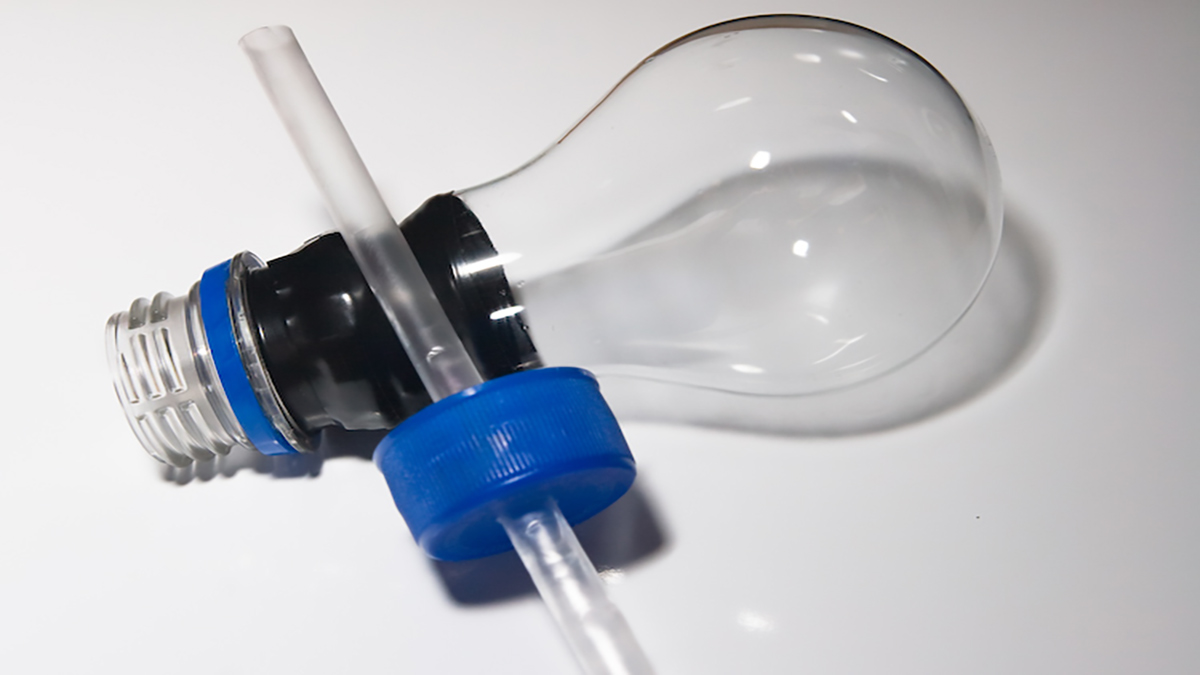
Hollow Out The Light Bulb
Start with a clear, ordinary light bulb (the type you’d put into a lamp). But before going any further, spread some paper towels or newspaper over your work area, because things might get a little messy. And if you happen to break the bulb on your first try, it will be a lot easier to throw out the paper than it will be to pick up all the shards of broken glass.
Here’s what to do next.
- Take some pliers and gently twist the bottom of the bulb (the part with the big rings that you screw into the socket) back and forth until it pulls off. You may have to start by carefully bending the edges of the metal away from the bulb.
- Now use a small screwdriver to gently pry off the black plastic insulator that blocks access to the inside of the bulb. If it doesn’t come off in one piece, use the pliers to remove whatever’s left.
- With the screwdriver and pliers, gently remove the components inside the bulb. (Have you noticed how many times we’ve used the word gently? It’s important.) The pliers will be best for taking out the small glass tube in the middle, and you can then wiggle the screwdriver around the inside of the bulb to knock out the filament and support hardware. Don’t worry if those parts break, you won’t be using them.
- Take out all the loose parts with the pliers, then shake or tap the bulb to make sure nothing’s left inside. You now have a hollow light bulb, and you’re ready to build your vape.
Making The Vaporizer
- Take a bottle cap that will fit tightly onto the base of the bulb (the cap from a two-liter soda bottle should work), and drill two small holes that drinking straws can snugly fit into.
- Now find two straws that fit the holes, insert the straws and secure them with duct tape, and you’re ready to vape.
Using A Light Bulb Vaporizer
- Put a small amount of finely-ground weed into the light bulb.
- Attach the bottle cap, with the straws both extending into the bulb. Use tape to secure the cap if necessary.
- Heat the bottom of the bulb with a candle. You can use a lighter if you prefer, but your rig will get hotter.
- When the bulb fills with vapor, inhale through one straw and use the other as a carb.
- Enjoy the experience!
Making A Homemade Weed Vaporizer: The Box Method
Do you get a little anxious thinking about trying to take a light bulb apart without breaking it? You’re not even sure where to find a light bulb? The whole process seems too complicated?
Here’s a simpler approach. The vaporizer won’t be quite as easy to use, and the vapor won’t be quite as potent – but just about anyone can pull this one off. The key component is nothing more than an ordinary cardboard box.
Collect the ordinary household items you’ll need: a small box, a small candle or tea light, a small metal tray that will be able to sit on top of the box (it could be the tray that goes into a toaster oven or even a jar lid, depending on the size of the box), a glass or glass jar large enough to completely cover the metal tray, and a bendy straw (a length of rubber tubing will work, too).
Once you have the “vaporizer” components, here’s how to assemble them.
- Put the candle in the middle of the box and light it.
- Rest the tray on top of the box, and put your flower in the tray so it’s above the flame.
- Put the glass over the tray so it fits snugly.
- Wait until the jar fills with vapor from your heated weed.
- Slip the straw under one edge of the jar, and inhale your vapor.
The box method won’t provide the same experience as a professionally-made vaporizer, of course. For that matter, neither will the light bulb method, although the vaping will be more pleasurable than it will from a box-and-jar contraption.
But either approach will give you a decent idea of what it’s like to vape weed – and may convince you to give the real thing a try. If you decide to try vaping, know this: you most definitely won’t be the only one enjoying the benefits of a cannabis vaporizer.
How To Make A Homemade Weed Vaporizer: FAQ
Q: Isn’t the best method the one that uses a heat gun, a cardboard tube, and an oven bag?
A: A lot of people swear by it, but we didn’t go into detail because you have to line the cardboard tube with tin foil – which some research suggests may put hazardous fumes into the vapor when it’s heated.
Q: Will these hacks really give me an honest idea of what it’s like to vape?
A: Not completely, but they’re a start. The light bulb method is a much better simulation of vaping, though, because the light bulb will be more air-tight than the box.
Q: Can you vape wax with one of these methods?
A: You can try, but you probably won’t succeed. Wax has to be heated at a higher temperature than flower, and you may have difficulty reaching the necessary temperature in a homemade vaporizer. The light bulb method might be a better choice because you have more control over the flame that would be heating the wax.